
07 Nov Painted Bunny Cookies
By Stevies Pantry
If you look at edible art and think, hmmm how do they do that? Well, keep reading, as I have some top tips and a step-by-step picture for you to copy.
I’ve put together a pictorial for you to follow and in this instance, I am adding my painted fondant icing topper to cookies, you can just as easily add these straight to an iced cupcake.
Step by step…
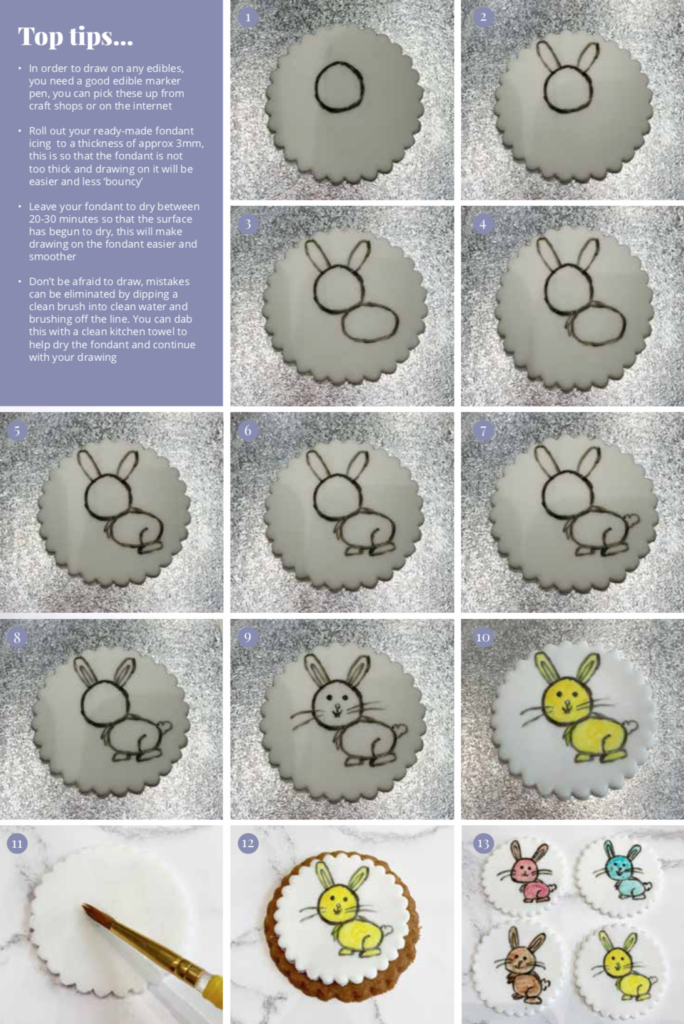
Step 1
Start by drawing a small circle towards to top half of your fondant circle, you can draw around a small object if you prefer, or freehand draw it.
Step 2
Draw two long bunny ears to reach the top of the circle, as evenly as possible.
Step 3
Draw a horizontal oval to the side bottom of your bunny’s head.
Step 4
Draw a little bit of fur around the top of the body, this creates more of a bunny fureffect. Use jagged lines to do this.
Step 5
Draw a curved line on the bottom right of the body and create a foot shape and join it with the body.
Step 6
Draw a smaller foot on the other side of the body.
Steps 7
For the cute tail, draw three small bumps in a circle at the end of the body, this shouldn’t be too big, and make sure it’s not bigger than the feet.
Steps 8
Draw the detail on the ears, if you don’t have any space within your ears to draw another loop, and a line down the middle would be fine.
Steps 9
The face, this can be adapted to suit your bunny. Here I’ve simply drawn two dots for the eyes, and a small circle for the nose, with the added mouth, and two whiskers on each side of the cheeks.
Step 10
Colouring in – I use edible paints or gels, mixed with a little bit of water to thin out the colour. Let your drawing dry to make sure the colour won’t soak up the black. Then lightly paint your image.
Please note: do not saturate your icing with colour or water, as this will cause the fondant icing to melt and it will lose shape and smudge the drawing.
Step 11
Once your painting has dried, turn over your icing and add a little bit of water all over the back of the fondant disc.
Step 12
Add on top of your biscuit, the fondant will stick with the water you applied.
If you’re adding this to an iced cupcake, you do not need to add water to the back of the fondant disc, as it will stick to the icing.
Step 13
Choose different colours to decorate your drawings.